If you have a mailbox that is approaching or exceeding the storage limit, you’ll want to try deleting or archiving your emails. There’s steps below for deleting any emails that you can, then setting up the archive, read through the steps first, then give it a go. The most effective method is deleting the unwanted email; sorting by the largest items first:
Try to delete all unnecessary Emails
You don’t want to spend time archiving emails that aren’t required; and forever waste space by storing them. The quickest way to bring the usage down dramatically is to follow the steps below and repeat for each folder (Inbox/Sent/subfolders):
- Sort the folder by largest, by clicking on the Size column.
- Scroll to the top and start with any emails 1MB or larger.
- Delete all that are not required, if you just require the attachment then save that to the server and delete the email.
- Sort by the Sender column.
- Scroll to find any contacts who send a lot on unnecessary emails.
- Highlight all of their emails in a block and delete.
- Finally, delete again from the deleted items folder to ensure they are permanently removed.
Setting up an archive
Set up a location on the server for your archive
- An archive should ideally be stored on a server shared folder. Open up a share and create a subfolder for yourself.
- Click into the address bar at the top when in the folder and copy the full address to your new folder.
In Outlook, click on ‘File’ > ‘Cleanup Tools’ > ‘Archive’
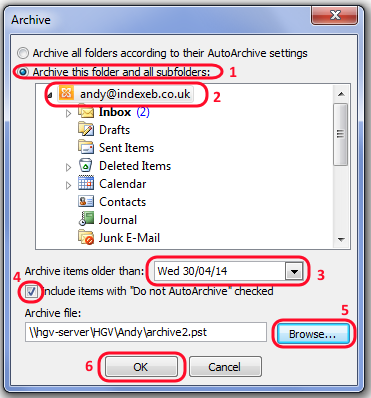
- In the Archive window, click on ‘Archive this folder and all subfolders.
- Click on the top level of your email account you want to archive (usually says your email address).
- Set a date to archive email (this date will roll forward and keep the difference to today’s date).
- You could start at 6 months ago, if this is not enough then I’ll let you know and you could reduce it further.
- Check the box to ‘Include items with “Do not AutoArchive” checked.
- Click ‘Browse’ and navigate to the location to store your archive. alternatively, if you copied the address where your folder is, just paste it into the box and you don’t need to browse.
- Once selected, hit OK to save the auto archiving settings.
If you have any questions or get stuck at any point then
contact us.